The first thing to do when we create a VPC is to log in to the AWS console. Then we select the AWS Region where we want to launch our VPC. We are going to use VPC Region Europe (London) eu-west-2. As the last step, we give the name to VPC and associate a CIDR block 10.10.0.0/16 to it.
Figure 1-3: Virtual Private Cloud (VPC) – Example VPC.
Select Region
Figure 1-4 shows the AWS Management Console main window. We are going to create our VPC to the AWS Region Europe (London) eu-west-2. As a first step, we need to pick up the selected region from the drop-down menu. Then we click the VPC hyperlink from the AWS services window. VPC hyperlink leads us to the VPC Dashboard.
Figure 1-4: Default VPC Components.
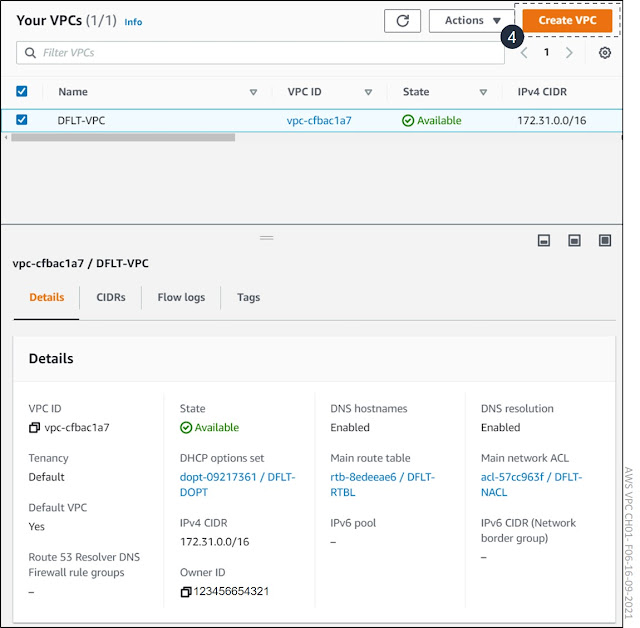
The section on the left in the VPC Dashboard window lists all resources based on their categories (VPC, Security, Reachability, etc.). The right column lists the same resources (with some expectation) and the count of launched resources and related AWS region. The right column shows that there is one VPC, three subnets, a route table, an Internet Gateway, DHCP Options Sets, Network ACL, and Security Group already in place. All of these are related to pre-defined Default VPC. Using the Default VPC is the simplest way to start using EC2 instances. The Default VPC has three subnets with /20 mask from the CIDR 172.31.0.0/16. Subnet 172.31.0.0/20 is attached to AZ eu-west-2c. Subnet 172.31.16.0/20 is bind to AZ eu-west-2a, and the third subnet 172.16.32.0/20 is attached in AZ eu-west-2b. Default VPC also has an Internet Gateway and a default route (0.0.0.0/0) towards it in the main routing table. If we launch an EC2 instance in default VPC, we only need to assign a public IP address to EC2 to allow an Internet connection. Instead of using the default VPC, we are going to create a new VPC. Even if you don’t use the default VPC, do NOT delete it. If you accidentally delete it, you can re-recreate it, but it is better not to do it. The default VPC, like any other default resource, doesn’t have a name by default. I have named all default resources using the DFLT prefix and the suffix based on the resource. As an example, I have named the default routing table DFLT-RTBL and the default VPC DFLT-VPC. If we don’t name resources, they are shown only with their resource id in drop-down menus. For example, when attaching a subnet to the VPC, the available VPCs are listed with their relative VPC-Ids, like vpc-cfbac1a7. When adding a name to VPC, it is shown like vpc-cfbac1a7 | DFLT-VPC. To proceed, click either Your VPC or VPCs hyperlinks (3).
Figure 1-5: AWS Resources.
Create VPC
Figure 1-6 shows the pre-defined Default VPC and its details. We can create a new VPC by clicking the Create VPC button (4).
Figure 1-6: Default VPC Components.
We give the name NVKT-VPC-01 for our VPC (5). The Name Tag is a Key/Value pair where the Key=Name, and the Value=NVKT-VPC-01 (8). We are going to use the CIDR block 10.10.0.0/16 (6). We don't use IPv6 addressing in this VPC. We do not need dedicated hardware for our EC2 instances, and we leave the Tenancy value to Default (7). If you need dedicated hardware to run EC2 instances on, select the Dedicated option from the drop-down menu. Next, click the Create VPC button (9).
Figure 1-7: Create VPC.
Figure 1-8 shows our new VPC vpc-04ef72cc79a73f82e / NVKT-VPC-01. Under the DHCP options set, Main route table and Main network ACL are hyperlinks for each service.
Figure 1-8: Default VPC Components.
DHCP Options Set
DHCP Options Sets defines the Domain name and DNS server. You can also define the NTP server. Note that we don’t have to specify DHCP pools for EC2 instances. The IP address for EC2 using DHCP will get the IP address and default GW from the subnet range where we launched it.
Figure 1-9: DHCP Options Set.
Main Route Table
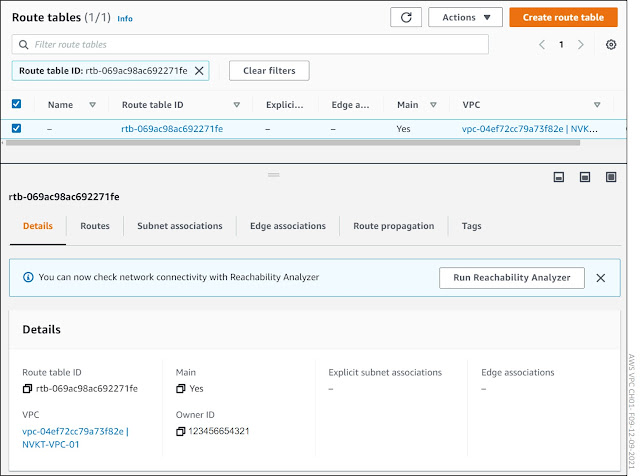
The Details tab in figure 1-10 shows us that this is the main route table for VPC NVKT-VPC-01. It also shows that we haven’t associate any subnets with it. When creating a new subnet, we will assign a dedicated, subnet-specific routing table. The reason for the dedicated route table is that we are going to use Internet GW for bi-directional Internet Connection in Public Subnet and NAT GW for uni-directional (egress-only) Internet access for Private Subnets. If we associate both subnets with the VPC main route table, we can only add one default route that we can use in all associated subnets. The Routes sheet shows the actual routes. There is only one route, the local route 10.10.0.0/16 (VPC CIDR block). This route is for Inter-VPC connection, and it makes sure that all EC2 instances within VPC have IP reachability between each other.
Figure 1-10: VPC Route Table: Details.
Figure 1-11: VPC Route Table: Routes.
The next post shows how we can verify our configuration using AWS CLI.


No comments:
Post a Comment