
Introduction
Back-End EC2 instances like Application and Database servers are most often launched on a Private subnet. As a recap, a Private subnet is a subnet that doesn’t have a route to the Internet Gateway in its Route table. Besides, EC2 instances in the Private subnet don’t have Elastic-IP address association. These two facts mean that EC2 instances on the Private subnet don’t have Internet access. However, these EC2 instances might still need occasional Internet access to get firmware upgrades from the external source. We can use a NAT Gateway (NGW) for allowing IPv4 Internet traffic from Private subnets to the Internet. When we launch an NGW, we also need to allocate an Elastic-IP address (EIP) and associate it with the NGW. This association works the same way as the EIP-to-EC2 association. It creates a static NAT entry to IGW that translates NGW’s local subnet address to its associated EIP. The NGW, in turn, is responsible for translating the source IP address from the ingress traffic originated from the Private subnet to its local subnet IP address. As an example, EC2 instance NWKT-EC2-Back-End sends packets towards the Internet to NGW. When the NGW receives these packets, it rewrites the source IP address 10.10.1.172 with its Public subnet IP address 10.10.0.195 and forwards packets to the Internet gateway. IGW translates the source IP address 10.10.0.195 to EIP 18.132.96.95 (EIP associated with NGW). That means that the source IP of data is rewritten twice, first by NGW and then by IGW.
Figure 4-1 illustrates our example NAT GW design and its configuration steps. As a pretask, we launch an EC2 instance on the Private subnet 10.10.1.0/24 (1). We also modify the existing Security Group (SG) to allow an Inbound/Outbound ICMP traffic within VPC CIDR 10.10.0.0/16 (2). We also allow an SSH session initiation from the 10.10.0.218/24. I’m using the same SG for both EC2 instances to keep things simple. Besides, both EC2 uses the same Key Pair. Chapter 3 shows how to launch an EC2 instance and how we modify the SGs, and that is why we go ahead straight to the NGW configuration.
When we have done pre-tasks, we launch an NGW on the Public subnet (3). Then we allocate an EIP and associate it with NGW (4). Next, we add a default route towards NGW on the Private subnet Route Table (5).
The last three steps are related to connectivity testing. First, verify Intra-VPC IP connectivity using ICMP (6). Then we test the Internet connectivity (7). As the last step, we can confirm that no route exists back to NWKT-EC-Backe-End from the IGW. We are using an AWS Path Analyzer for that (8).
Note! Our example doesn’t follow good design principles. AWS Availability Zones (AZ) are restricted failure domains, which means that failure in one AZ doesn’t affect the operation of other AZ. Now, if our NGW on AZ eu-west-2c fails, Internet traffic from the Private subnet on eu-west2a fails. The proper design is to launch NGW on the AZ where unidirectional egress Internet access is needed.

Create NAT Gateway and Allocate Elastic IP
Navigate to the AWS VPC dashboard and select NAT Gateways.

Figure 4-2: Greate NAT Gateway – Step 1.
We don’t have any NGW at this phase. Click the Create NAT gateway button.

Figure 4-3: Greate NAT Gateway – Step 2.
Fill in the optional Name field. It creates a Key/Value Pair where the key is Name and the Value NWKT-NAT-GW. Select the Private subnet NWKT-Pub-euw2c (subnet-04af160d1d10aee071). We have two options for the Connectivity option. Using the default option Public, we allow EC2 instances from Private subnets gets uni-directional, stateful connection to the Internet. That means that they are not accessible from the Internet. The public option requires an Elastic IP address. The Private option allows connection from the Private subnet to our on-prem resources, either via Transit Gateway or Virtual Private Gateway. You can’t associate EIP with Private NGW. Select the Public option. Then click the Allocate Elastic IP address button. Figure 4-5 shows that AWS has allocated the EIP allocation Id eipalloc-0cda321ba6a5c5e06. Click the Create NAT gateway button to launch the NGW.

Figure 4-4: Greate NAT Gateway – Step 3.1.
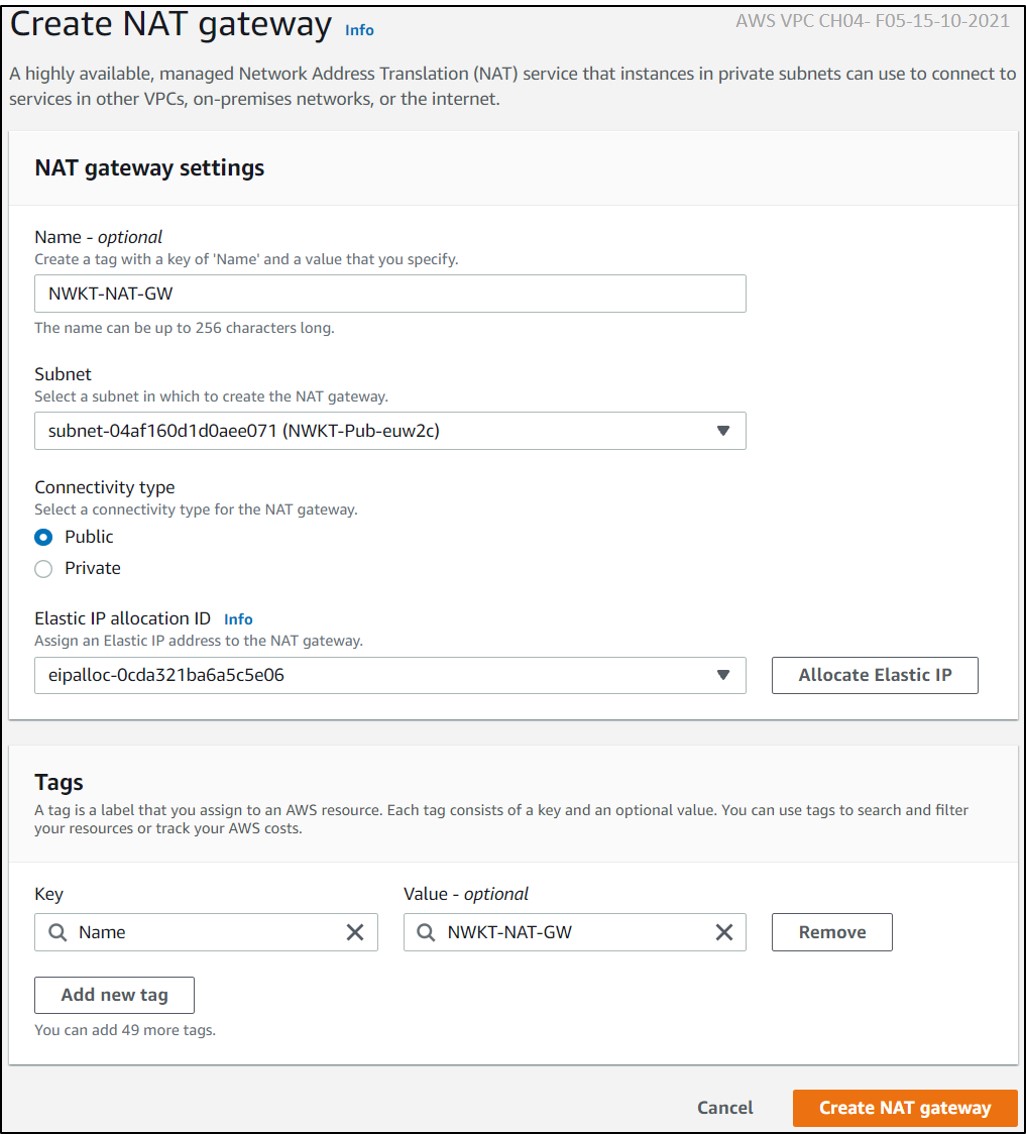
Figure 4-5: Greate NAT Gateway – Step 3.2.
Figure 4-6 shows that the State of the process is Pending. Our NGW Id is nat-0cb51f58d75940a28. At this phase, the EIP, Private IP address, and Network Id are not visible.

Figure 4-6: Greate NAT Gateway – Step 4.1.
After the state is changed to Available, we can see the allocated EIP (18.132.96.65), the Private IP address (10.10.0.195), and the Elastic Network Interface Id (eni-0efe78e391410c31f).

Figure 4-7: Greate NAT Gateway – Step 4.2.
Example 4-1 shows the same information in JSON format.
aws ec2 describe-nat-gateways
{
"NatGateways": [
{
"CreateTime":
"2021-10-14T10:12:46.000Z",
"NatGatewayAddresses": [
{
"AllocationId":
"eipalloc-0cda321ba6a5c5e06",
"NetworkInterfaceId": "eni-0efe78e391410c31f",
"PrivateIp":
"10.10.0.195",
"PublicIp":
"18.132.96.65"
}
],
"NatGatewayId":
"nat-0cb51f58d75940a28",
"State":
"available",
"SubnetId":
"subnet-04af160d1d0aee071",
"VpcId":
"vpc-04ef72cc79a73f82e",
"Tags": [
{
"Key":
"Name",
"Value": "NWKT-NAT-GW"
}
]
}
]
}
Example 4-1: Confirm the Nat Gateway from the AWS CLI.
Example 4-2 shows our two EIP allocations.
aws ec2 describe-addresses --output table
-------------------------------------------------------------
| DescribeAddresses |
+-----------------------------------------------------------+
|| Addresses ||
|+--------------------------+------------------------------+|
|| AllocationId |
eipalloc-0cda321ba6a5c5e06 ||
|| AssociationId |
eipassoc-003e422c757246773 ||
|| Domain | vpc ||
|| InstanceId | ||
|| NetworkInterfaceId |
eni-0efe78e391410c31f ||
|| NetworkInterfaceOwnerId | 123456654321 ||
|| PrivateIpAddress |
10.10.0.195 ||
|| PublicIp | 18.132.96.65 ||
|| PublicIpv4Pool |
amazon ||
|+--------------------------+------------------------------+|
||| Tags |||
||+-------------------+-----------------------------------+||
||| Key
| Name |||
||| Value |
NWKT-NAT-GW
|||
||+-------------------+-----------------------------------+||
|| Addresses ||
|+--------------------------+------------------------------+|
|| AllocationId |
eipalloc-01c7d2a4877a061a7 ||
|| AssociationId |
eipassoc-0b82dad3a3908bbf2 ||
|| Domain | vpc ||
|| InstanceId |
i-0b282af5751def332 ||
|| NetworkInterfaceId |
eni-07f8f9b7ff3a91f2c ||
|| NetworkInterfaceOwnerId | 123456654321 ||
|| PrivateIpAddress |
10.10.0.218 ||
|| PublicIp | 18.134.62.112 ||
|| PublicIpv4Pool |
amazon ||
|+--------------------------+------------------------------+|
||| Tags |||
||+-----------------+-------------------------------------+||
||| Key
| Name |||
||| Value
| NWKT-PUBLIC-IP |||
||+-----------------+-------------------------------------+||
Example 4-2: Elastic IP Address Allocation.
Add Route to NGW on Private Subnet Route Table
We have already created Subnet 10.10.1.0/24 specific NWKT-PRI-RT in chapter one. Though, we didn’t associate a subnet with it. Navigate to the Route Table view and select the Route Table NWKT-PRI-RT. Next, associate subnet NWKT-Pri-euw2a (subnet-045deac93 e40bf218) with it.

Figure 4-8: Associate Private Subnet to Route Table.
Next, we add the default route to the Route Table. Click the Edit routes button.

Figure 4-9: Add Default Route to Route Table.
Fill in the Destination field with 0.0.0.0/0. Then select NAT Gateway from the Target drop-down menu.

Figure 4-10: Route 0.0.0.0/0 to NAT Gateway.
Select our NAT Gateway from the list and click the Save changes button.

Figure 4-11: Save Route Table Changes.
aws ec2 describe-route-tables --filters
Name=tag:Name,Values=NWKT-PRI-RT --output table
--------------------------------------------------------------------------------------------------
| DescribeRouteTables |
+------------------------------------------------------------------------------------------------+
||
RouteTables ||
|+-----------------------------------+----------------------------------------------------------+|
|| OwnerId | 017857243309 ||
|| RouteTableId | rtb-0e7261b40b0d5237b ||
|| VpcId | vpc-04ef72cc79a73f82e ||
|+-----------------------------------+----------------------------------------------------------+|
||| Associations |||
||+-------------------------------------------+------------------------------------------------+||
||| Main | False |||
||| RouteTableAssociationId | rtbassoc-0c17e355e3b156dda |||
||| RouteTableId | rtb-0e7261b40b0d5237b |||
||| SubnetId | subnet-045deac93e40bf218 |||
||+-------------------------------------------+------------------------------------------------+||
|||
Routes
|||
||+-----------------------+------------+-------------------------+-------------------+---------+||
|||
DestinationCidrBlock | GatewayId |
NatGatewayId | Origin |
State |||
||+-----------------------+------------+-------------------------+-------------------+---------+||
||| 10.10.0.0/16 |
local | | CreateRouteTable | active |||
||| 0.0.0.0/0 | |
nat-0cb51f58d75940a28 | CreateRoute |
active |||
||+-----------------------+------------+-------------------------+-------------------+---------+||
|||
Tags |||
||+---------------------------------+----------------------------------------------------------+||
||| Key | Name
|||
||| Value | NWKT-PRI-RT
|||
||+---------------------------------+----------------------------------------------------------+||
Example 4-3: Route Table of Subnet NWKT-PRI-RT.
Test Connections
We are going to use NWKT-EC2-Fron-End as a Jump Server to access NWKT-EC-Back-End. To do that, I copy the shared NWKT-KEY-EC2.pem file to the instance NWKT-EC-Front-End. Note that this is not a recommended solution. In reality, you should never store a pem file in the EC2 instance which uses it for authentication.
scp -i
NWKT-KEY-EC2.pem NWKT-KEY-EC2.pem
ec2-user@ec2-18-134-62-112.eu-west-2.compute.amazonaws.com:/home/ec2-user
Example 4-4: Route Table of Subnet NWKT-PRI-RT.
Then we open an SSH connection to instance NWKT-EC2-Front-End. As a first test, we ping the Private IP address of the instance NWKT-EC-Back-END (10.10.1.176). Example 4-5 shows that it works fine.
C:\folder-1\folder-2\AWS> ssh -i "NWKT-KEY-EC2.pem"
ec2-user@ec2-18-134-62-112.eu-west-2.compute.amazonaws.com
Last login: Mon Oct 11 10:39:06 2021 from
91-153-26-170.elisa-laajakaista.fi
__| __|_ )
_| (
/ Amazon Linux 2 AMI
___|\___|___|
https://aws.amazon.com/amazon-linux-2/
[ec2-user@ip-10-10-0-218 ~]$
[ec2-user@ip-10-10-0-218 ~]$ ping 10.10.1.176
PING 10.10.1.176 (10.10.1.176) 56(84) bytes of data.
64 bytes from 10.10.1.176: icmp_seq=1 ttl=255 time=3.27
ms
64 bytes from 10.10.1.176: icmp_seq=2 ttl=255 time=0.983
ms
^C
--- 10.10.1.176 ping statistics ---
2 packets transmitted, 2 received, 0% packet loss, time
1001ms
rtt min/avg/max/mdev = 0.983/2.129/3.275/1.146 ms
Example 4-5: Route Table of Subnet NWKT-PRI-RT.
As the last test, we open an SSH connection to instance WNKT-EC2-Back-End and ping the Google DNS Anycast address. We can see that the connection works fine.
[ec2-user@ip-10-10-0-218
~]$ ssh -i "NWKT-KEY-EC2.pem"
ec2-user@ip-10-10-1-176.eu-west-2.compute.internal
Last
login: Thu Oct 14 10:07:15 2021 from ip-10-10-0-218.eu-west-2.compute.internal
__|
__|_ )
_|
( / Amazon Linux 2 AMI
___|\___|___|
https://aws.amazon.com/amazon-linux-2/
[ec2-user@ip-10-10-1-176
~]$
[ec2-user@ip-10-10-1-176
~]$ ping 8.8.8.8
PING
8.8.8.8 (8.8.8.8) 56(84) bytes of data.
64 bytes
from 8.8.8.8: icmp_seq=1 ttl=100 time=3.19 ms
64 bytes
from 8.8.8.8: icmp_seq=2 ttl=100 time=2.83 ms
64 bytes
from 8.8.8.8: icmp_seq=3 ttl=100 time=2.72 ms
64 bytes
from 8.8.8.8: icmp_seq=4 ttl=100 time=2.78 ms
64 bytes
from 8.8.8.8: icmp_seq=5 ttl=100 time=2.74 ms
^C
---
8.8.8.8 ping statistics ---
5
packets transmitted, 5 received, 0% packet loss, time 4007ms
rtt
min/avg/max/mdev = 2.720/2.854/3.192/0.176 ms
[ec2-user@ip-10-10-1-176
~]$
Example 4-6: Route Table of Subnet NWKT-PRI-RT.
As the last step, we use the Reachability Analyzer tool to confirm that the instance NWKT-EC2-Back-End is not reachable from the Internet. We are using IGW as a source and the instance NWKT-EC2-Back-End as the destination. The destination port is 22 and protocol TCP.

Figure 4-12: Reachability Analyzer – Define Path Information.

Figure 4-13: Reachability Analyzer Test – Result: Nor Reachable.
Billing
Figure 4-14 shows a detailed report of our costs so far. It is self-explanatory, and I won’t go through it in detail.

Figure 4-14: Billing.
These books are available at Leanpub.com and Amazon. Just type my name (Toni Pasanen) into the search field.
From left to right:
Virtual Extensible LAN - VXLAN: A Practical Guide to VXLAN Solution
LISP Control-Plane in Campus Fabric: A Practical Guide to Understand the Operation of Campus Fabric
VXLAN Fabric with BGP EVPN Control Plane: Design Considerations
Object-Based Approach to Cisco ACI: The Logic Behind the Application Centric Infrastructure
Cisco SD-WAN: A Practical Guide to Understand the Basics of Cisco Viptela Based SD-WAN Solution

No comments:
Post a Comment